Showing posts with label baby. Show all posts

Tuesday, October 27, 2009

Arrrgh Ye Ready fer some Fun?

Oops! This was supposed to post last Friday for "Fun Friday," but I guess I messed up on the "post options" selection. I hope this tutorial is helpful for those of you still trying to figure out what to dress your little kids for Halloween!

It's the twins' second Halloween, and I just can't wait to dress them up!


Tutu

+


Pirate Hat

=


Pirate Princess!


Homemade pants

+


Pirate Hat

=


Pirate King!

I bought some tulle from Joann's, measured Lamb's waist, cut the tulle pieces in black and red, cut some red ribbon, tied the tulle and ribbon onto the elastic band, and I had a pirate tutu! Thanks to Tanya's tutu tutorial at Trey and Lucy! It was super easy! The red and white fabric is actually a little "tube top." Of course, she'll be wearing a white long-sleeved onesie underneath.

Cuddler's pants were super easy too! I took a pair of pants he currently wears and used it as a template for his pants. I strung elastic at the waist, sewed it up, and wala! A pair of pirate pants! He could also probably wear it on Independence Day, but they probably won't fit by then. He'll be wearing a red long-sleeved onesie with this costume.

Happy Halloween!


my signature

Thursday, September 24, 2009

Baby Blankets Repurposed!

It's "Fun Friday" again!

You know how much I LOVE saving money, right?
Well, this post is no exception!
I didn't want to spend a lot of $$ buying TWO of those cart/high chair covers, so I did this instead!


I took TWO blankets the babies already had. They're 42" x 32." Any smaller than that probably wouldn't cover the front and back of a cart or a high chair. The blankets I used were double-sided flannel. I'm only showing Lamb's cover. Sorry, I forgot to take a pic of Cuddler's.


I measured my babies' thighs and added a couple of inches to the circumference (for growth). I cut ovals in their circumference about 2/3 of the length and centered. You could drape the blanket on your highchair at home and estimate and guess where the holes would be in a cart or a public high chair. Finally, I zig-zag stitched the edges to keep them from fraying. It was super easy, and it didn't cost me anything because I already had everything!
 I hope this tutorial helps anybody who wants to save money from having to buy covers at the stores.
These could also be made more fun by attaching ribbons to hang their favorite toys to, so they won't be bored at the restaurant or when you're out shopping for HOURS. Ummm.. I don't do that.

Good luck!


my signature

Friday, September 18, 2009

Fun Friday #4: Quick Onesie Project & Appliques Repurposed

Happy Friday everyone!


I recently cut up some appliques and embroidery from an old jean skirt, and I've really wanted to do something fun with them.
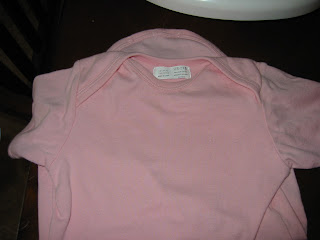
Lamb has a bunch of simple onesies that I wanted to "spiffy up" or at least make a little more interesting. Here's my attempt!


What I Needed:
make the onesie more interesting


What Materials I Used:

pink plain onesie
salvaged appliques from an old skirt
pink thread
sewing machine
scissors
pins


What I Did:
I cut up and saved old appliques from a skirt.
I pinned the appliques to the front and back of the onesie.
I used a zigzag stitch and stitched around the appliques.
Ten minutes later, the pink onesie is more fun and interesting!


my signature

Friday, August 21, 2009

Bib Carriers

WARNING!
The following project is SUPER EASY!
I've been on "Use what you have lying around for stuff that you need!" kick. I'm sure my husband is loving it lately, since I'm not out spending $$$ at Joann's twice a week. Did I just confess to that? Actually, I've been very good for the past two months.


Here is what I needed:

I needed some kind of container to conveniently store my twins' many necessary bibs without me having to run around and waste my time getting them ready for their feedings. Plus, I wanted something that didn't take up too much space.


Here was my solution:

I made carriers that tie on to the back of the chairs that house their Space Saver Highchairs! I must tell you though... they're more practical than "cute." I'm sure somebody out there will improve the look of this very quickly. Maybe something with yo-yo's? I thought about it, but then I thought about how no one else is going to be looking at it everyday but me and my husband!


Here is what I used for each "bib carrier":

2 pieces of fabric at 20" x 20"

matching thread

sewing machine

2 strands of ribbon 1/2" ribbon at 30" each


Here is how I made them:

First, I measured the backs of my chairs. They measured at 18" x 18." I'm sure yours will be different. I cut my two pieces of fabric (20" x 20") and made "pillow cases."


I sewed about an inch seam on all sides and then made them like "pillow cases."


Then, I cut two strands of ribbon at 30" each, folded each one in half, and sewed each one at about 3" inches from the seams. I only sewed the ribbons to one side of the bags.


Finally, I tied the bib carriers to the backs of the chairs.
Ta da!
A practical, out of the way, convenient container for my twins' many necessary bibs! Of course, the blue is for my boy, "The Cuddler" and the pink is for my girl, "The Lamb."
Here's what you can do when your baby grows out of bibs:
*Stuff it and make a cute pillow for them.
*Attach another pair of ribbons on the other side and make a cute bag.
*Make a pillow case dress!
I hope you have fun making it!


my signature

Friday, April 17, 2009

Hello Out There!


Hello out there, Crafting World!


I'm very excited to blog about some of my favorite things!


You'll find that I enjoy almost every kind of crafting. Here are some of my creations, upcycles, and redesigns. I hope you visit often because I'll be showing some of my latest projects here often.


Have fun and Happy Crafting!


fun baby clips for my daughter


our bedroom


candles for our bedroom


These were crystal garlands found at the wedding aisle at a craft store.


easy curtains for the bedroom


pretty little corner for our "cottage" guest room


stenciled cherries


more cherries for a "pink on pink" room


cherry curtains


potpourri


I loved our towels so much, but I couldn't find a picture or painting that I liked for the bathroom. I photocopied one of the towels and framed it!


I saw some framed leaves and flowers, and I thought they were beautiful. I didn't want to pay the $10 for each one, so I made my own using the cards they sold at the same store.


I hate doing laundry, so I thought I'd give the laundry room some pizzaz to make it more fun. I love the drying rack, but I still don't enjoy doing the laundry.


My husband thought this was silly; I thought it was whimsical.


some magnolias next to President Hinckley's pic


I gave this lamp a "suede" look using brown paint, yellow paint, and SARAN wrap!


I also did the SARAN wrap thing on two other tables like these. They were a yucky yellow "marble" color before.


I made this at an Enrichment Night a couple of years ago. It was my first try at "destressing."


I sewed the paisley pillows and covered up old ones.


sliding glass door curtain


I upcycled a flannel baby receiving blanket my son loves into a ribbon or "taggie" blanket.


Here was my son's blanket before.


This is the one I made for my daugher- also using a blanket she loved.


Here are the materials I used for the blanket.